Custom morphs#
A ROM section in Preset mode runs a DTH release asset as it ships. Switch it to Custom and you list the morphs yourself. This page continues Your first character, which does exactly that for its Full Body Morphs (FBM) section.
Import from an existing Daz scene#
A section already posed on a Daz timeline doesn't have to be typed in again. Import from Daz scene reads those keyed frames and turns each one into a pose row. Click it, then pick a scene — or drag the
A failed check blocks the scan and says why, with the usual "Scan anyway" escape if you know better. Start scan hands the scene to Daz Studio — the same job runner DTH Export uses, so it needs the Runner plugin installed (Installation). Daz opens the scene, scans it with no dialogs and the studio takes you straight to the frame-range picker. It looks like nothing is happening in Daz: that is the point — the run opens no windows, and it clears the scene again when it finishes. If Daz wasn't already running it is started minimized, so the scan never takes over your screen. Cancel scan takes the job back if you change your mind. Scans you already made stay listed in the same dialog, newest first. That is
deliberate: one scan of a scene can feed several ROM sections, so importing
FBM after RET should not send you back to Daz. Browse still takes any CSV
you curated yourself, and running |
Each pose row has two name fields with very different jobs:
- Name — your name for the generated morph; it travels to Houdini and later Unreal Engine. Letters, numbers and underscores only — Houdini rejects anything else. The group's Left/Right suffix is appended automatically.
- Parameter name — must exactly match the parameter's internal name in Daz Studio (not its display label), or that frame fails in the ROM run.
Note
An import fixes the names for you. Daz property labels are prose —
Torso Muscular, !Breast Large, Shape NAVEL FOR PEAR — so a scanned
section used to arrive as a grid of rows flagged red, with dozens of names to
retype by hand. Import from Daz scene now strips what Houdini rejects:
Torso Muscular becomes TorsoMuscular, which reads the same and passes.
Nothing is lost — the raw Daz property stays on the morph and is still what
the Parameter name column shows, so each row says exactly which morph it
drives. This applies to what the studio derives on import, not to what you
type: a name you enter is still flagged rather than silently rewritten.
A pose row can also drive its one output from several Daz morphs at once — expand its morphs toggle.
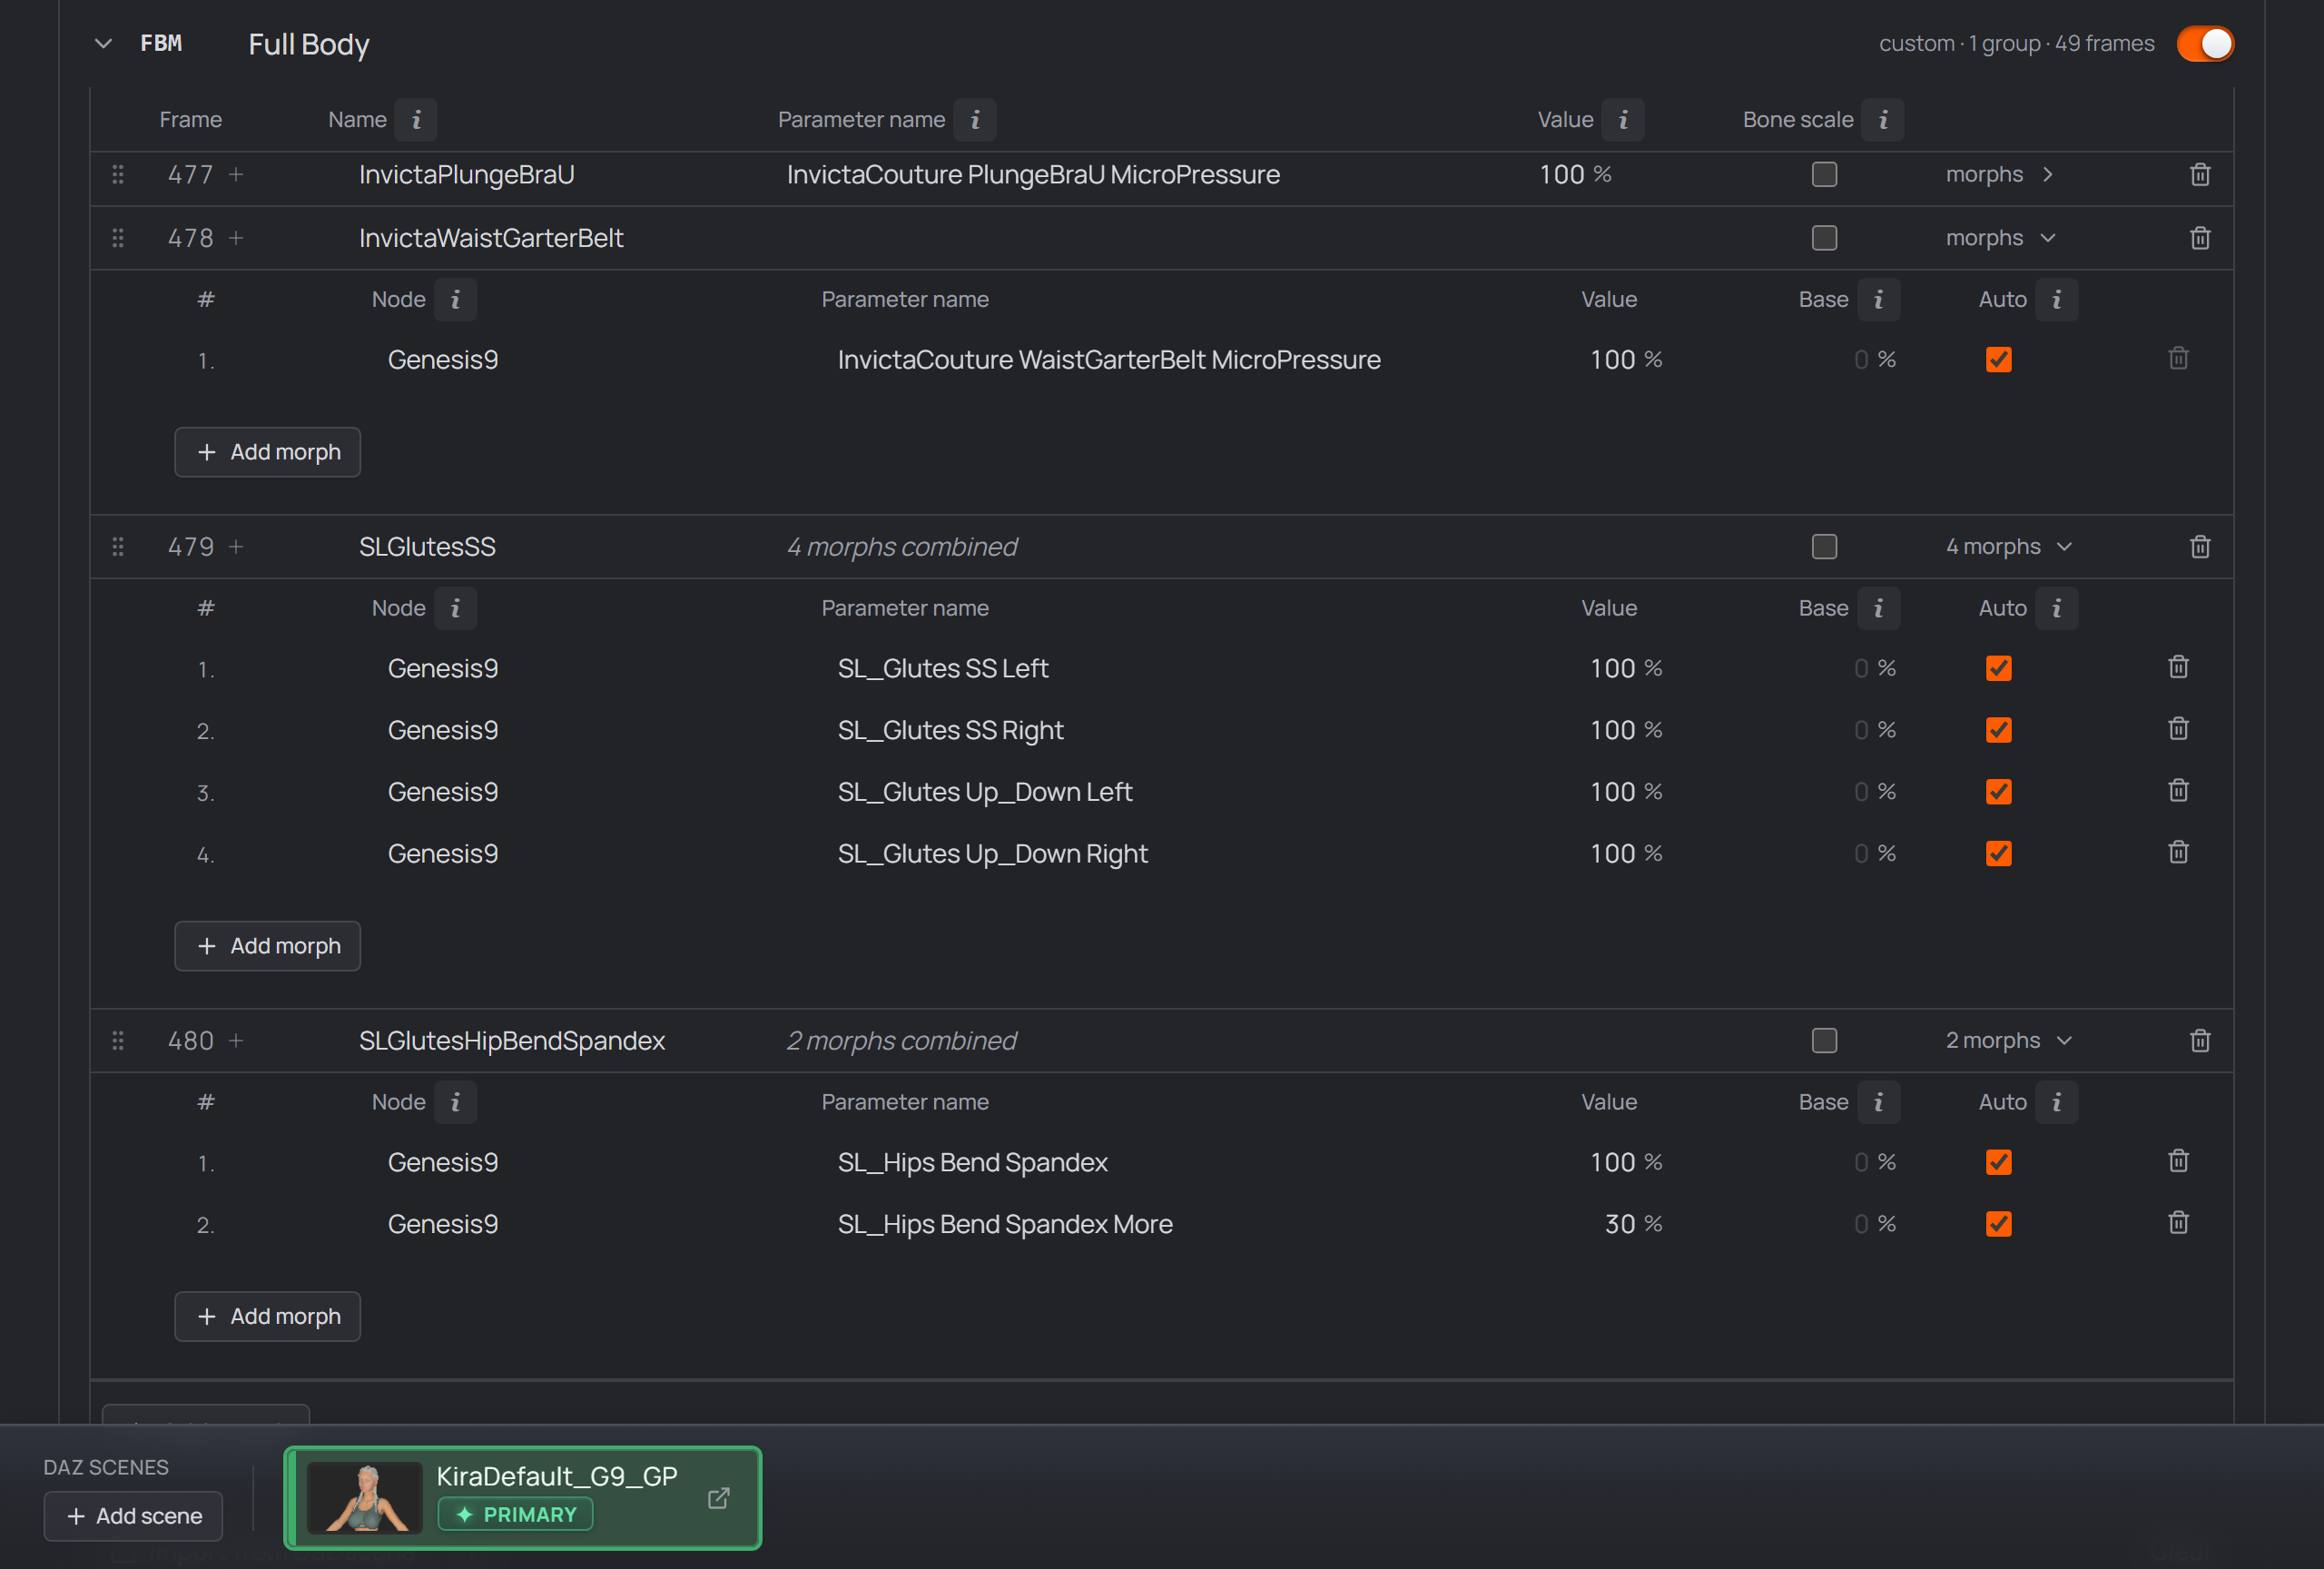
Expanded pose rows — a plain single-morph row on top, and two rows combining several morphs into one output below.
Every entry in that expanded list carries its own:
- Node — the scene node the morph lives on (
Genesis9,GoldenPalace_G9, a bone, …); autocomplete fills it in when you pick a suggestion. - Parameter name — the morph's internal Daz name (same rule as the main row's Parameter name).
- Value — what this morph is dialed to at the pose's frame.
- Base (optional) — the value the morph returns to on the frames
around the pose (default
0). Set it for a morph that's part of the character's base shape, so the ROM keys the delta instead of snapping the morph up from zero. Only read when Auto is off. - Auto — on by default. Instead of a fixed Base, read the base from the morph's current scene value when the script runs.
Why Auto is on by default. ROM morphs and base-shape morphs are allowed to overlap. A "shaped" variant of a character — its own scene, built partly from FBM morphs the ROM also walks — is a perfectly normal thing to make, and you shouldn't have to think about it. With Auto on, a morph the open scene already dials to, say, 100% sawtooths back to that value around its pose instead of being flattened to
0, so the ROM stops erasing the base shape on every neighbouring frame. A morph the scene does not dial reads0at frame 0 anyway, so for every non-overlapping morph — which is most of them — Auto changes nothing at all. Turn it off only when you want a fixed Base (or a hard reset to0) regardless of what the scene is doing.
Combining several morphs into one output — why you'd do it#
Combining bakes a shape that only exists as a combination of dials — or a controller plus its corrective — into a single clean morph for Houdini and Unreal: all the listed morphs are keyed together on that one frame and blend into the output named in Name. Add morph adds more; the trash icon removes one (a pose always keeps at least one). |
Bone scale — morphs that scale bones (reference skeletons)#
Some morphs also scale bones (Torso Length, Proportion Height, and the like). Generated morphs can only move vertices, and Daz's FBX export doesn't carry bone scales — the body would reshape while the skeleton stays put. Such frames need a reference-skeleton FBX: an export carrying the morph and its bone scale, which the Houdini PoseAsset points at for that frame (its Reference FBX File input). Tick Bone scale on the pose row and the studio handles that end to end:
the frame is handed to the DTH Exporter Plugin, which writes the FBX into
a
Note Bone scale only acts when the export actually runs — that's when the
studio drives the exporter. Turn Run the export with the ROM script off (and
don't run the split Only GEN and FBM poses can be reference frames — the two categories DazToHue supports reference skeletons in. DTH's own Guide To Creating Custom ROMs describes the feature in depth. |

Section & group tools — suffixes, mirroring, reordering, inserting#
Each section header has its Enable switch and Mode (Preset / Custom)
select. In Preset mode you can pick the exact DTH release asset (when
several match); a red no G9 asset chip (naming the character's generation)
appears when the active release ships nothing for it. The JCM section's Custom mode
takes a path to your own pose preset ( Grouped sections carry per-group settings in their header:
Inside a group: drag rows to reorder (frames simply renumber — they're never stored), and the small + next to a frame number inserts an empty pose before or after it. |
Finding a morph's internal Daz name#
The Parameter name the studio asks for is the parameter's internal name,
which usually differs from the slider's label (label Body Tone → internal
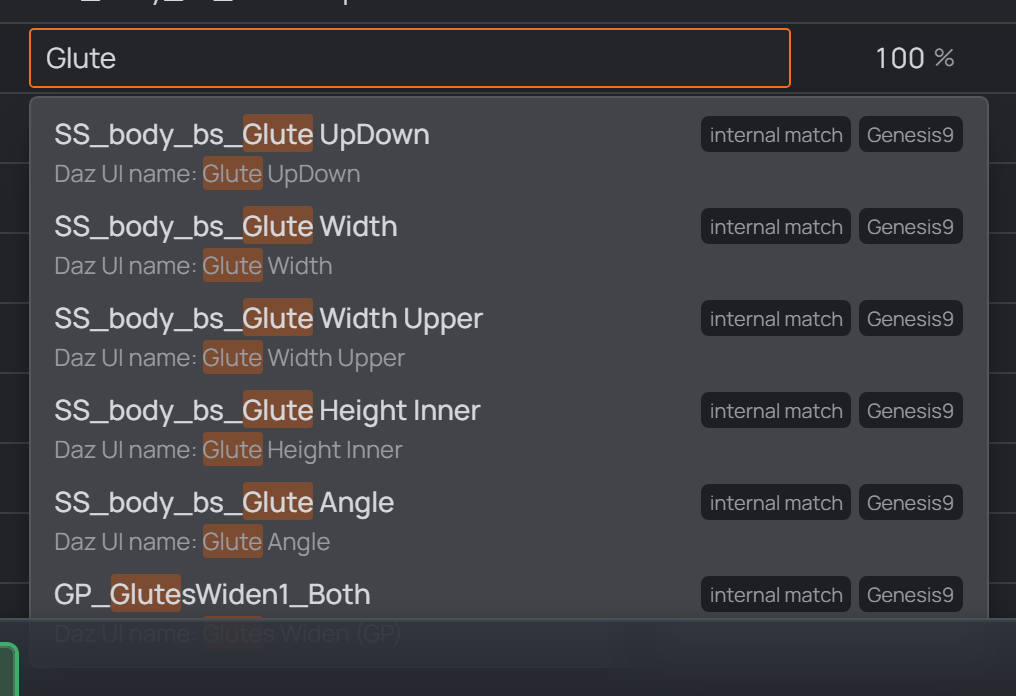
body_bs_BodyTone). The comfortable way is the studio's autocomplete —
one unattended scan (Tools → Scan & index) covers every generation, and
from then on each Parameter name field suggests matches as you type. The
manual route via Parameter Settings (right screenshot) still works for a
single name.
Left: a morph's internal name differs from its slider label. Right: the manual route via Parameter Settings.
Recommended: scan once, then autocomplete — Tools → Scan & index#
The index behind the autocomplete is something the studio builds for you — there is no script to hunt down: open Tools → Scan & index → Scan project, tick what you want and press Start scan. The studio hands Daz Studio one batch and works through it unattended, reporting progress on the button.
From then on, every Parameter name field autocompletes after two typed characters — searchable by internal name or Daz UI label — and picking a suggestion fills in the exact internal name and the right node: no more mismatched node/morph pairs.
Manual execution — the same build as a Daz script. The runtime
installation also puts the base build into your Daz library as a visible
script —
Run by hand it behaves exactly like the batch — it confirms which generations it found installed, builds the stock figures one generation at a time, finishes on an empty scene, and a summary reports what was indexed per generation, which geograft file it picked, and anything it couldn't find — so a missing product, or an unexpected pick after a product update, is never silent. With figures already loaded it offers to scan the open scene instead of building fresh ones (that path never touches your scene — it's only the build that clears), and if that scene is saved it asks how to file the finds: For this scene (suggested only while that scene is selected — what the Character morphs pass does for linked scenes) or into the base index (suggested everywhere — for a figure or geograft the stock build genuinely doesn't cover).
|